There are two types of job submission. One is interactive, the other is batch. Interactive jobs allow users to type in commands while the job is running. Batch jobs are self-contained sets of commands in a script submitted to the cluster for execution on a compute node. The following will cover some basic commands to start running jobs.
Interactive Jobs
Interactive jobs allow users to apply applications in a High-Performance Computing (HPC) environment through real-time interaction. Users can request one or more compute nodes from the HPC cluster via SLURM and directly run commands or scripts in the command line.
While you debug, test, and troubleshoot code, you can run a job interactively. Any time you are running a script or an executable, it should be done using an interactive job, and not run on the login node. Interactive jobs will allocate resources and connect you into a compute node.
To begin an interactive job, type:
[johnchris@l001 ~]$ interactive
this will run “srun -t 4:00:00 -N 1 -n 1 -c 4 –mem=8gb –partition=shared –pty /bin/bash” and assign you 4 CPU and 8GB RAM memory for 4 hours.
OR
[johnchris@l001 ~]$ interactive -X
this will run “”srun -t 4:00:00 -N 1 -n 1 -c 4 –mem=8gb –partition=shared –pty –x11 /bin/bash” which allows for you to apply graphical applications on a compute node. For example: Matlab, Rstudio and Stata etc.
Please refer to the instructions for running jobs interactively in the file below:
Interactive_Instruction_Andromeda.pdf
Batch jobs
This is the most common type of job on an HPC system. Batch jobs are frequently used for applications that run for long periods of time and require no manual user input. Users can check the results when the job finishes without requiring any user interaction.
Parameters such as memory, the number of cores, type of node, partitions and wall clock time requested are specified in a command file. You can use the SLURM type of script file, ‘.sl’, to submit a job to the compute node on Andromeda.
Here is an example of a sample.sl script file
———————————————————————————————————————
#!/bin/bash
#SBATCH --job-name=sample. # Job name
#SBATCH --ntasks 1 --cpus-per-task 1 # 1 cpu on single node
#SBATCH --mem=1gb # Job memory request
#SBATCH --time=00:10:00 # Time limit hrs:min:sec
#SBATCH --mail-type=BEGIN,END,FAIL. # Mail events (NONE, BEGIN, END, FAIL, ALL)
#SBATCH --mail-user= your-BC-email-address # Where to send mail
cd work-directory
./a.out
———————————————————————————————————————
This will request 1GB of memory and 1 CPU on a single node for 10 minutes. Slurm should send an email to your BC email address for job state changes defined as ‘END,’ ‘BEGIN,’ and ‘FAIL.’ Note: The maximum requested time is 5 days (120:00:00); the email address must be a BC email address
To submit the job via the SLURM script file sample.sl, type:
[johnchris@l001 ~]$ sbatch sample.sl
Submitted batch job 2193158
scancel: cancel a job(s) from the queue
“scancel jobid” will cancel a job with a job id.
[johnchris@l001]$ scancel 2193185
Slurm Basic Usage
The following provides a basic introduction to getting started with Slurm. Users will learn about the Slurm resource manager/job scheduler, how to specify the resources they need, and how to submit, monitor, and cancel their jobs on the Compute node.
Get started with Slurm
In order to request cluster resources through Slurm, you’ll need to create an Sbatch script file, also called a Slurm script. Your Sbatch scripts should generally follow the format below:
#!/bin/bash
# Declaring Slurm Configuration Options
# Loading Software/Libraries
# Running Code
The first line indicates the program to run the Slurm script file with. In this case, it’s bash. You’re recommended to use bash. If you use tcsh, you can define the first line as #!/bin/tcsh.”
Slurm Configuration Options:
Please refer to the full list of configurations on the Slurm website using the following link:
https://slurm.schedmd.com/sbatch.html
Many options are available, but we strongly recommend sticking with the basics as they provide a good set of configuration options to meet your computing needs.
The format of Slurm Sbatch is specified as follows:
#SBATCH  (1 options)=(value)
#SBATCH  (2 options)=(value)
#SBATCH  (3 options)=(value)
#SBATCH (n options)=(value)
This structure allows you to specify multiple options and their corresponding values
when configuring your Slurm Sbatch script.”
Job Computing Configurations
a). Job name: #SBATCH –job-name=<job_name>
The purpose of a job title is to remind yourself of what you are doing. The first thing you will want to do is give your job a name. It should be descriptive yet concise.
For example: #SBATCH –job-name=vasp
b). Partition: #SBATCH –partition=<partition_name>
In a cluster computing environment, partitioning refers to the logical division of computing resources within the cluster. Each partition represents a subset of cluster nodes and resources, which allows efficient management and allocation of resources based on different criteria.
For example: #SBATCH –partition=shared
c). Time Limit: #SBATCH –time=D-HH:MM:SS
Users are required to inform Slurm about the expected duration of their job. The format for specifying runtime is D-HH:MM:SS, representing Days-Hours:Minutes:Seconds. The maximum time limit is 5 days on Andromeda. If a user requests a runtime exceeding 5 days, the job will not be scheduled through Slurm.
For example: #SBATCH –time=3-10:30:00 indicates a runtime requirement of 3 days, 10 hours, 30 minutes, and 0 seconds.
In case, if users would like to extend the job over 5 days,. please create a ticket for the request to Research Services here: Research Services Request Form
d). Email: #SBATCH –mail-user= your-BC-email-address
#SBATCH –mail-type=<BEGIN,END,FAIL,ALL>
Users have the option to receive email notifications from Slurm regarding their compute jobs in the queue system and can specify the types of Slack notifications they wish to receive. Available options include BEGIN (when your job starts), END (when your job finishes), FAIL (if your job fails), and ALL (all of the previous conditions).
For example: #SBATCH –mail-user=johnchris@bc.edu.
It’s important to note that only BC email addresses can be used
Job Output Configurations
a). Output File: #SBATCH –output=%x_%j.out
Users have the ability to specify the output file name for their running job in Slurm. %x is a variable that fills in the user’s job name, and %j is a variable that fills in the user’s job ID number. Additionally, users can choose to place their output file in a specific folder.
For example: #SBATCH –output=logs/%x_%j.ou.
b). Error File: #SBATCH –error=%x_%j.err
Users have the ability to specify the error file name for their running job in Slurm. %x is a variable that fills in the job name, and %j is a variable that fills in the job ID number. Users can also choose to place their error file in a designated folder.
For example: #SBATCH –error=logs/%x_%j.err.
Compute Node Configurations:
Users have the option to request only a single node. For jobs where the code can leverage MPI (Message Passing Interface), scheduling on multiple nodes might lead to quicker processing
a). Nodes: #SBATCH –nodes=<num_nodes>
Users can request nodes for jobs.
For example: #SBATCH –nodes=1
b) Excluding Nodes: #SBATCH –exclude=<node1,node2,…>
In case, users want to ensure that their job does not run on a specific node or nodes, they can achieve this using the –exclude option.
For example: #SBATCH –exclude=c001,c002,c003
#SBATCH –exclude=c[001-003]
c) Exclusive Access to a Node: #SBATCH –exclusive
Users can choose to utilize all resources on a single node exclusively by specifying “#SBATCH –exclusive”. The following set of options grants the user exclusive access to the entire node:
For example: #SBATCH –nodes=1
#SBATCH –exclusive
Task Configurations:
Based on the Slurm context, tasks are processes that can be executed either on multiple nodes or on a single node. A task represents a running instance of a program. For most practical purposes, users can consider tasks as equivalent to processes.
a). Number of Tasks: #SBATCH –ntasks=<num_tasks>
Slurm assigns one task to one node by default. User can specify more than one tasks as below
For example: #SBATCH –ntasks=3
b). Number of Tasks per Node: #SBATCH –ntasks-per-node=<num_tasks>
If users use multiple nodes, users can specify a number of tasks per node.
For example: #SBATCH –ntasks-per-node=2
CPU Configurations:
a). CPUs per Task: #SBATCH –cpus-per-task=<num_cpus>
Slurm assigns one cpu to per task by default. User can specify more than one cpus in a job as below
For example: #SBATCH –cpus-per-task=4.
GPU Configurations:
Andromeda provides two partitions with GPUs, namely gpuv100 and gpa100. The two partitions provide NVIDIA V100 and NVIDIA A100s, respectively. Users can define a GPU on either by adding to the Slurm file.
a). GPUs per gpu Job: #SBATCH –gres=gpu:<num_gpus>
Slurm will not allocate any GPUs to users’ jobs by default. Users need to specify how many and what type of GPUs their job would like to use. The following pair of options allows the job to run on a GPU node (NVIDIA V100) with 2 GPUs selected.
For example: #SBATCH –partition=gpuv100
#SBATCH –gres=gpu:2
Memory Configurations
a). Memory per Node: #SBATCH –mem=<memory>
Users can specify how much memory is needed per node. The default unit is megabyte, where ‘k’ stands for kilobytes (KB), ‘m’ for megabytes (MB), ‘g’ for gigabytes (GB), and ‘t’ for terabytes (TB).
For example: #SBATCH –mem=10g
Note that this represents 10GB of memory per node
b). Memory per CPU: #SBATCH –mem-per-cpu=<memory>
Users can also set a RAM memory limit per CPU.
For example: #SBATCH –mem-per-cpu=10g
Note that this limit corresponds to 10GB of RAM memory per CPU
Please ensure there is no conflict between –mem and –mem-per-cpu parameters in the SLURM file. The following example cannot be scheduled due to an excessive memory request per CPU.
For example:
——————————————————————
…
#SBATCH –nodes=2
#SBATCH –ntasks-per-node=1
#SBATCH –cpus-per-task=2
#SBATCH –mem=10m
#SBATCH –mem-per-cpu=10m
——————————————————————-
Note: Users are requesting 2 nodes per task, with a total of 4 CPUs and 2 CPUs per task. The memory request is set to 10 MB per node. Since each node only has 10 MB of memory and 2 CPUs, the maximum memory we can request per CPU is 5 MB
c).Whole Memory for One Node: #SBATCH –mem=0,
Users should define “#SBATCH –mem=0” to allocate the entire memory for one node when applying “#SBATCH –exclusive
Slurm Filename Variables
Please see the link for the details of filename parameters.
https://slurm.schedmd.com/sbatch.html#SECTION_%3CB%3Efilename-pattern%3C/B%3E
The following table lists some of the common filename variables that might be useful for users.
| Variable | Description | Example |
| %x | Job name. | #SBATCH –output=%x_%j.out |
| %j | Jobid of the running job. | #SBATCH –error=%x_%j.err |
| %N | short hostname. This will create a separate IO file per node. | #SBATCH –output=%N_%x_%j.out |
| %a | Job array ID (index) number. | #SBATCH –error=%x_%a_%j.err |
| %% | The character “%”. | #SBATCH –output=%x_20%%.out |
Slurm Script & CPU Slurm file sample
CPU Slurm file sample
The user has requested 1GB of memory and 1 CPU on a single node for 10 minutes. Slurm should send an email to your BC email address for job state changes defined as ‘END,’ ‘BEGIN,’ and ‘FAIL.’ Note: The maximum requested time is 5 days (120:00:00); the email address must be a BC email address. See the cpu_test.sl Slurm file as follows.
———————————————————————————————————————
#!/bin/bash
#SBATCH –job-name=sample. # Job name
#SBATCH –output=%x_%j.out # Output file
#SBATCH –error=%x_%j.err # Error file
#SBATCH –nodes=1 # How many nodes to run on
#SBATCH –ntasks=1 –cpus-per-task=1 # 4 cpu on single node
#SBATCH –partition=shared # Partition CPU node to run your job on
#SBATCH –mem=1g # Job memory request
#SBATCH –time=00:10:00 # Time limit hrs:min:sec
#SBATCH –mail-type=BEGIN,END,FAIL. # Mail events (NONE, BEGIN, END, FAIL, ALL)
#SBATCH –mail-user= your-BC-email-address # Where to send mail
module load stata
cd (path to working directory)
stata test.do
———————————————————————————————————————-
And the corresponding python script:
$ test.do
—————————————–
webuse auto
d
regress price mpg foreign
——————————-
GPU Slurm file sample:
Users with codes explicitly written to run on GPUs can utilize the GPU resources. A user requests a single GPU on the ‘gpuv100’ partition. and it can then make use of the requested GPU resources. It’s worth noting that multiple GPUs can be requested for a single job, with each GPU node having 4 GPUs available. For instance, let’s request a GPU node and verify that PyTorch can access the GPU.
The gpu_test.sl Slurm file as follows.
———————————————————————————————————————
#!/bin/bash
#SBATCH –job-name=sample. # Job name
#SBATCH –output=%x_%j.out # Output file
#SBATCH –error=%x_%j.err # Error file
#SBATCH –nodes=1 # How many nodes to run on
#SBATCH –ntasks=1 –cpus-per-task=1 # 1 cpu on single node
#SBATCH –partition=gpuv100 # Partition GPU node to run your job on
#SBATCH –gres=gpu:4 #number of gpus per node
#SBATCH –mem-per-cpu=1g # Job memory request
#SBATCH –time=00:10:00 # Time limit hrs:min:sec
#SBATCH –mail-type=BEGIN,END,FAIL. # Mail events (NONE, BEGIN, END, FAIL, ALL)
#SBATCH –mail-user= your-BC-email-address # Where to send mail
module load pytorch/1.10.1gpu.cuda11.2
cd (path to working directory)
python3 torch_test.py
—————————————————————————————————–
And the corresponding python script:
$ torch_test.py
————————————————————-
import torch
if torch.cuda.is_available():
device = torch.device(“cuda”)
else:
device = torch.device(“cpu”)
print(f”Device = {device}”)
———————————————————–
Submitting this job should output “Device = cuda”, indicating that the GPU is available to do work in PyTorch.
Slurm job submitting
Submitting your job is easy! Simply use the command $ sbatch <slurm_test.sl >.
To submit the job via the SLURM script file sample.sl, type:
[johnchris@l001 ~]$ sbatch sample.sl
Submitted batch job 2193158
Monitor System Processes and Resource Usage (CPU and RAM etc) for running jobs on the Compute node
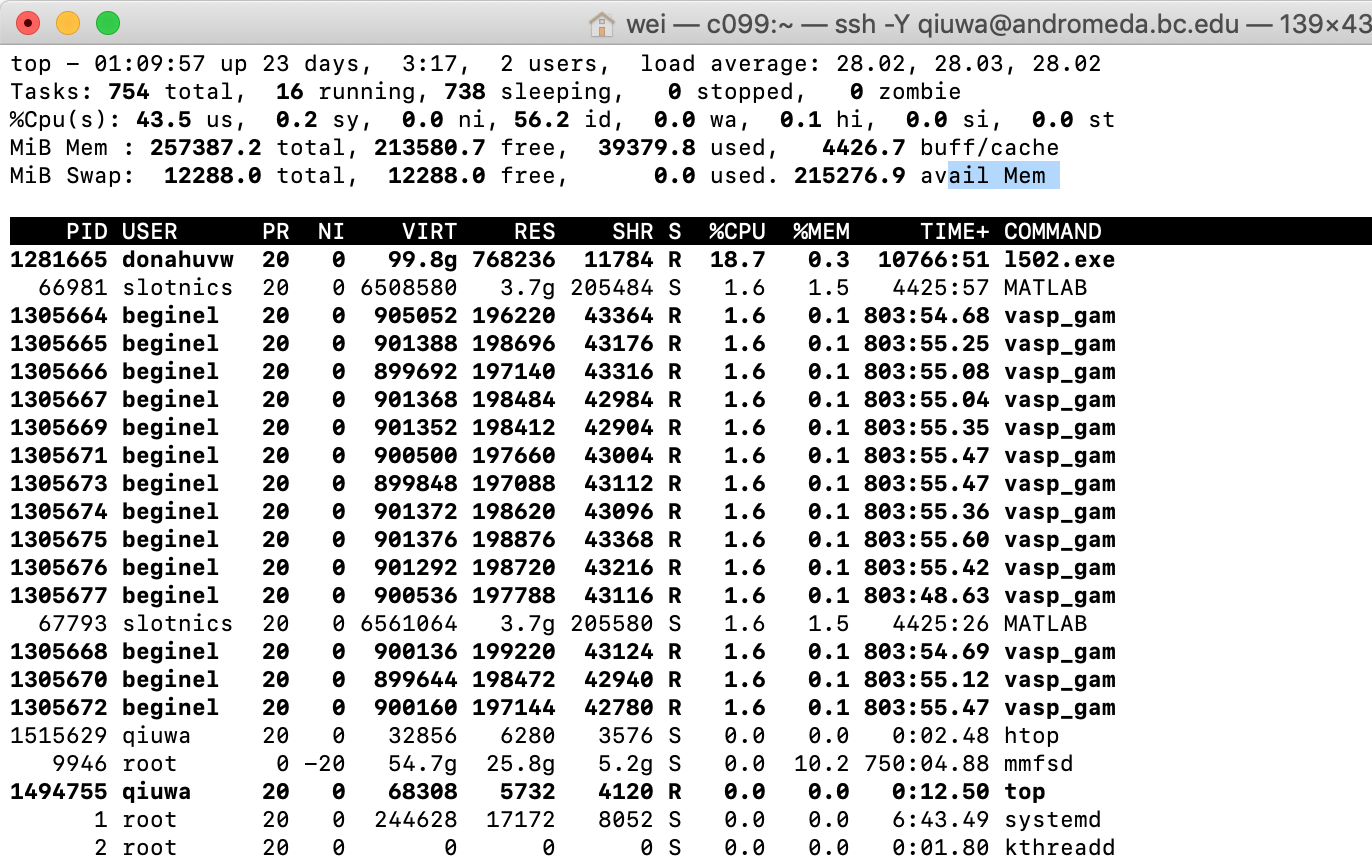
‘htop’ and ‘top’ are powerful and interactive tools to monitor system processes and resource usage of the running job on a Linux cluster.
Please see the link for the detailed usage of ‘htop’ and ‘top’.
https://gridpane.com/kb/how-to-use-the-htop-command-to-monitor-system-processes-and-resource-usage/
https://gridpane.com/kb/how-to-use-the-top-command-to-monitor-system-processes-and-resource-usage/
htop:
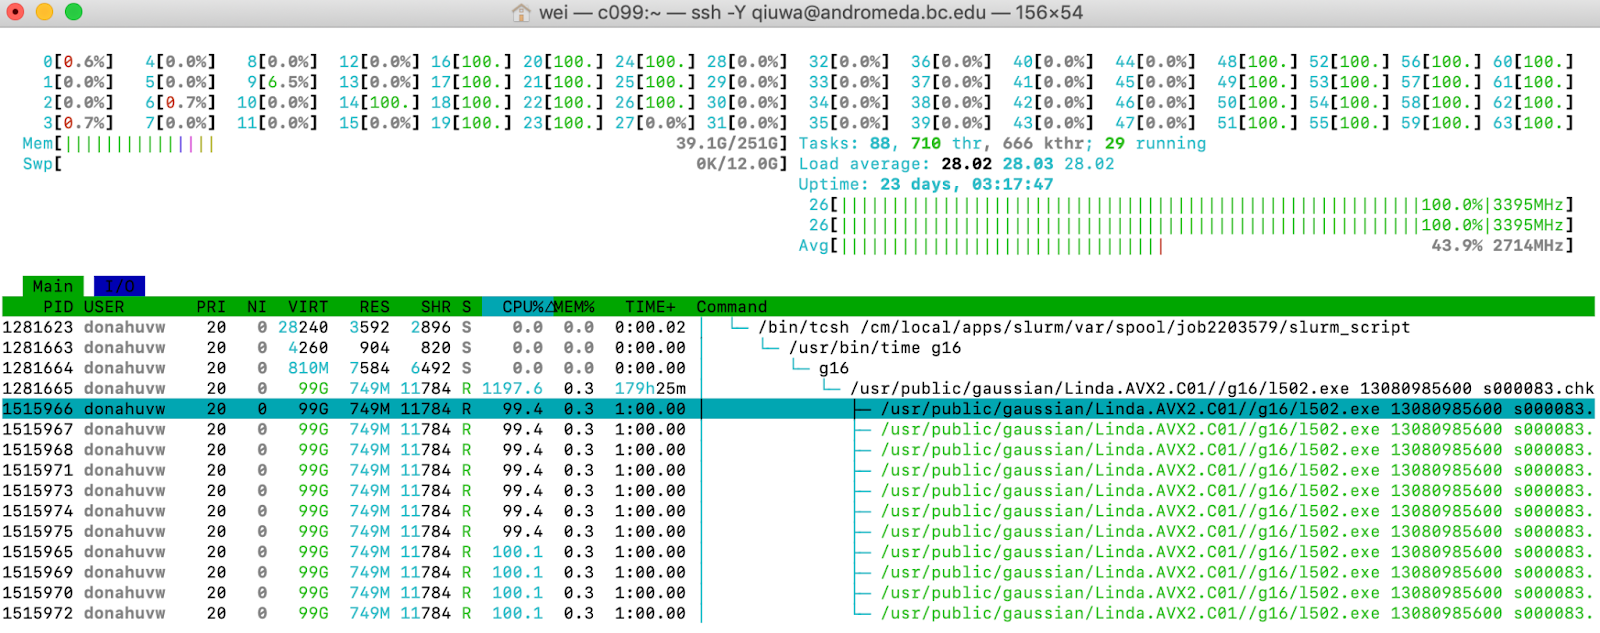
In the htop screenshot above, we see two sections (split by the horizontal green row). Above the green row, we see a graph of the CPU usage for all CPUs on c099. Currently, one CPU (#19) is being 100% used (which is what we like to see), and CPUs #2, #6, #15, #24, and #25 are being partially used. All others are partially used. 1197/64 = 18.703%
top:
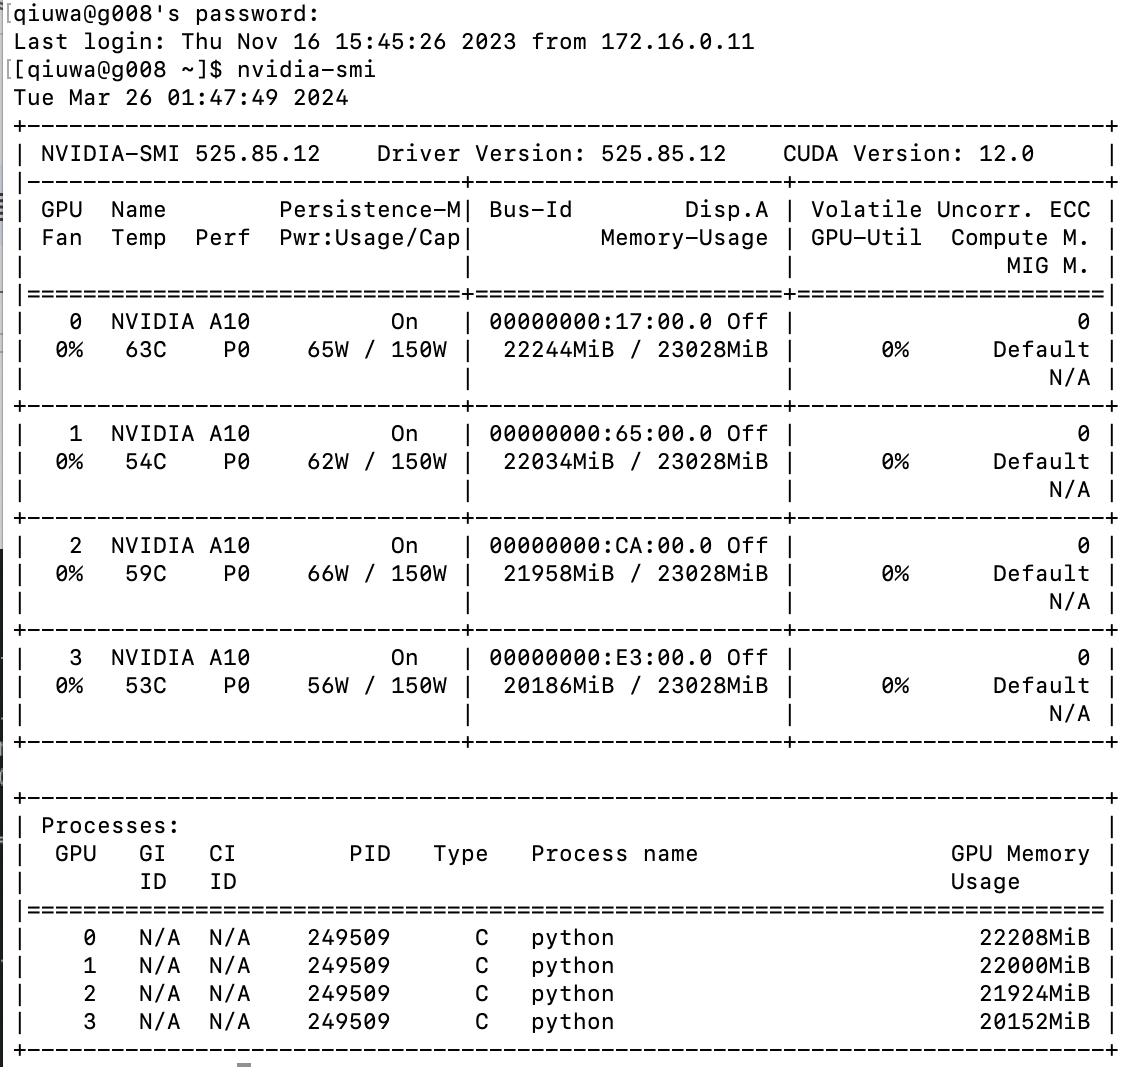
6. Monitor gpu usage for running jobs on the GPU node
Slurm Inspection Commands
All jobs must be submitted to the queuing system. For Andromeda, we are using SLURM to schedule jobs to the Compute nodes. The most common SLURM commands are as follows:
1. sinfo: View state of the partitions and nodes
[johnchris@l001 ~]$ sinfo
PARTITION AVAIL TIMELIMIT NODES STATE NODELIST
admin2 up 5-00:00:00 0 n/a
anzellos up 5-00:00:00 1 idle g003
exclusive up 5-00:00:00 22 maint c[133-140,143,145-147,149,152-155,162-163,167-168,173]
exclusive up 5-00:00:00 1 down$ c150
exclusive up 5-00:00:00 36 alloc c[028-033,039-040,066-067,070-071,142,144,148,151,174-193]
exclusive up 5-00:00:00 98 idle c[034-038,041-065,068-069,072-092,156-161,164-166,169-172,194-225]
exclusive up 5-00:00:00 2 down c[141,226]
full_nodes48 up 5-00:00:00 0 n/a
full_nodes64 up 5-00:00:00 0 n/a
gpu_test up 5-00:00:00 0 n/a
gpua100 up 5-00:00:00 1 mix g007
gpua100 up 5-00:00:00 6 idle g[004-006,010-012]
gpuv100 up 5-00:00:00 2 idle g[001-002]
partial_nodes up 5-00:00:00 0 n/a
shared* up 5-00:00:00 39 maint c[093-105,107-132]
shared* up 5-00:00:00 1 down$ c106
shared* up 5-00:00:00 20 mix c[001-014,022-027]
shared* up 5-00:00:00 7 idle c[015-021]
| PARTITION | Name of a partition. shared, exclusive, gpu100, gpuv100, weidf and anzellos |
| AVAIL | Partition state: up or down |
| TIMELIMIT | Maximum time limit for any user job in days-hours:minutes:seconds, default 5 days |
| NODES | Count of nodes with this particular configuration |
| STATE | State of the nodes. Possible states include: allocated, completing, down, drained, draining, fail, failing, future, idle |
| NODELIST | Names of nodes associated with the configuration/partition. |
$ sinfo
PARTITION AVAIL TIMELIMIT NODES STATE NODELIST
tier3 up 5-00:00:00 61 mix skl-a-[01-46,49-61,64],theocho
tier3 up 5-00:00:00 2 alloc skl-a-[62-63]
debug up 1-00:00:00 1 mix skl-a-47
debug up 1-00:00:00 1 idle skl-a-48
interactive up 12:00:00 1 mix clx-a-01
interactive up 12:00:00 1 idle clx-a-02
2. show the jobs running and pending to run: squeue
[johnchris@l001 ~]$ squeue
JOBID PARTITION NAME USER ST TIME NODES NODELIST(REASON)
2150059_[1-50] exclusive vasp_arr wangcho PD 0:00 2 (Dependency)
2150069_[1-50] exclusive vasp_arr wangcho PD 0:00 2 (Dependency)
2150079_[1-50] exclusive vasp_arr wangcho PD 0:00 2 (Dependency)
…
2183669 shared CuTPP_DT wangbhv R 1-17:29:47 1 c022
2192967 shared nx xuoz R 5:11:21 1 c002
2192965 shared nx xuoz R 5:13:22 1 c027
2193154 shared bash vagraa R 1:16:31 1 c005
2183813 weidf gpu_task adhinart R 4-06:13:57 1 g008
…
2192119 shared CuTPP_Ot wangbhv R 22:20:24 1 c025
2185165 exclusive Pt100-op beginel R 1-22:27:53 2 c[039-040]
2185166 exclusive Rh100-op beginel R 1-22:27:22 2 c[070-071]
….
| JOBID | Job or step ID. |
|---|---|
| PARTITION | Name of a partition. shared, exclusive, gpu100 and gpuv100 etc |
| NAME | Name of the job in the queue |
| USER | Owner of the job in the queue |
| ST | State of the job. Include: allocated, completing, down, drained, draining, fail, failing, future, idle |
| TIME | Time used by the job. days-hours:minutes:seconds |
| NODES | Number of nodes allocated to the job |
| NODELIST (REASON) | For pending and failed jobs, this field displays the reason for pending or failure. Otherwise, this field shows a list of allocated nodes |
“squeue -u username”
will view only the jobs from a specific user
3. sacct: list the jobs have been run
[johnchris@l001 ~]$ sacct
JobID JobName Partition Account AllocCPUS State ExitCode
———— ———- ———- ———- ———- ———- ——–
2192238 sample shared schaudt 4 COMPLETED 0:0
2192238.bat+ batch schaudt 4 COMPLETED 0:0
2192238.ext+ extern schaudt 4 COMPLETED 0:0
2192271 bash shared schaudt 4 FAILED 2:0
2192271.ext+ extern schaudt 4 COMPLETED 0:0
2192271.0 bash schaudt 4 FAILED 2:0
2192355 sample shared schaudt 1 CANCELLED+ 0:0
2193158 sample shared schaudt 1 PENDING 0:0
“sacct -j jobid” will display only the one or more jobs listed
[[johnchris@l001 ~]$ sacct -j 2193166
JobID JobName Partition Account AllocCPUS State ExitCode
———— ———- ———- ———- ———- ———- ——–
2193166 ts.pbs exclusive baoju 48 RUNNING 0:0
2193166.bat+ batch baoju 48 RUNNING 0:0
2193166.ext+ extern baoju 48 RUNNING 0:0
4. display the status of jobs, nodes, partitions, etc.: scontrol:
“scontrol show job jobid”
will show detailed information about job with ID (including the jobscript)
[[johnchris@l001 ~]$ scontrol show job 2192965
JobId=2192965 JobName=nx
UserId=xuoz(10021) GroupId=chemmanu(6357) MCS_label=N/A
Priority=525913 Nice=0 Account=chemmanu QOS=normal
JobState=RUNNING Reason=None Dependency=(null)
Requeue=1 Restarts=0 BatchFlag=1 Reboot=0 ExitCode=0:0
RunTime=06:10:38 TimeLimit=10:59:00 TimeMin=N/A
SubmitTime=2024-02-26T17:21:54 EligibleTime=2024-02-26T17:21:54
AccrueTime=2024-02-26T17:21:54
StartTime=2024-02-26T17:22:10 EndTime=2024-02-27T04:21:10 Deadline=N/A
SuspendTime=None SecsPreSuspend=0 LastSchedEval=2024-02-26T17:22:10
Partition=shared AllocNode:Sid=l001:1167620
ReqNodeList=(null) ExcNodeList=g[001-012]
NodeList=c027
BatchHost=c027
NumNodes=1 NumCPUs=4 NumTasks=1 CPUs/Task=4 ReqB:S:C:T=0:0:*:*
TRES=cpu=4,mem=50G,node=1,billing=16
Socks/Node=* NtasksPerN:B:S:C=0:0:*:* CoreSpec=*
MinCPUsNode=4 MinMemoryNode=50G MinTmpDiskNode=0
Features=(null) DelayBoot=00:00:00
OverSubscribe=OK Contiguous=0 Licenses=(null) Network=(null)
Command=/mmfs1/data/xuoz/NETS2021/Code/NNXX_covid/0_run.sl
WorkDir=/mmfs1/data/xuoz/NETS2021/Code/NNXX_covid
StdErr=/mmfs1/data/xuoz/NETS2021/Code/NNXX_covid/0_run.sl.e2192965
StdIn=/dev/null
StdOut=/mmfs1/data/xuoz/NETS2021/Code/NNXX_covid/0_run.sl.o2192965
Note: The job start time is an estimate; it may change as other jobs are submitted. The memory and wall clock time parameters require you to estimate the amount of time your job will need to finish. If you underestimate, your job may be killed before it completes. If you overestimate, your job may take longer to start, as the queuing system finds a way to allocate the resources.
5.show each Compute node’s information (processors, RAM memory etc) on Andromeda: shosts
“shosts -f” will view the free compute nodes information on Andromeda, type:
[[johnchris@l001 simple_stata]$ shosts -f
NODELIST PARTITION STATE MEMORY FREE_MEM CPUS(A/I/O/T) AVAIL_FEATURES REASON
c001 shared* mixed 185 29 20/28/0/48 (null) none
c002 shared* mixed 185 135 4/44/0/48 (null) none
c003 shared* mixed 185 17 21/27/0/48 (null) none
c004 shared* mixed 185 6 40/8/0/48 (null) none
…
g004 gpua100 idle 250 250 0/64/0/64 (null) none
g005 gpua100 idle 250 250 0/64/0/64 (null) none
1. A/I/O/T means Allocated/Idle/Other/Total
2. Memory is in GB
3. The default Partition has a ‘*’
We recommend that users use the -f option to check compute node information before submitting jobs to the cluster. It lists free memory and available processors for each compute node on Andromeda, providing a useful reference for users.
| NODELIST | cpu nodes: c001 to c226, GPU node: g001 to g012 |
| PARTITION | Name of a partition. shared, exclusive, gpu100, gpuv100, weidf and anzellos |
| STATE | State of the nodes. Possible states include: allocated, completing, down, drained, draining, fail, failing, future, idle |
| MEMORY | total RAM memory for the Compute node: 250GB or 185GB |
| FREE_MEM | free RAM memory available on the compute node |
| CPUS(A/I/O/T) | A: Allocated; I: Idle; O:Other; T:Total For example: 40/24/0/64 |
| AVAIL_FEATURES REASON | None |
If you want more specifics, you can use
sinfo -o ‘%11P %5D %22N %4c %21G %7m %11l’:
[qiuwa@l001 ~/bin]$ sinfo -o ‘%11P %5D %22N %4c %21G %7m %11l’
PARTITION NODES NODELIST CPUS GRES MEMORY TIMELIMIT
admin2 0 0 (null) 0 5-00:00:00
anzellos 1 g003 48 gpu:4 190000 5-00:00:00
exclusive 159 c[028-092,133-226] 48+ (null) 190000+ 5-00:00:00
full_nodes4 0 0 (null) 0 5-00:00:00
full_nodes6 0 0 (null) 0 5-00:00:00
gpu_test 0 0 (null) 0 5-00:00:00
gpua100 4 g[004-007] 64 gpu:v10064:4 256000 5-00:00:00
gpua100 3 g[010-012] 64 gpu:a100:4 250000 5-00:00:00
gpuv100 2 g[001-002] 48 gpu:v100:4 190000 5-00:00:00
partial_nod 0 0 (null) 0 5-00:00:00
shared* 67 c[001-027,093-132] 48+ (null) 190000+ 5-00:00:00
weidf 2 g[008-009] 64 gpu:a10:4 510000 5-00:00:00
[johnchris@l001 ~]$ squeue -u beginel
JOBID PARTITION NAME USER ST TIME NODES NODELIST(REASON)
2185165 exclusive Pt100-op beginel R 1-23:07:48 2 c[039-040]
2185166 exclusive Rh100-op beginel R 1-23:07:17 2 c[070-071]
2193155 exclusive R1-again beginel R 1:52:26 20 c[174-193]
| JOBID | Job or step ID. |
|---|---|
| PARTITION | Partition of the job/step |
| NAME | Name of the job/step |
| USER | Owner of the job/step |
| ST | State of the job/step. |
| TIME | Time used by the job/step. days-hours:minutes:seconds |
| NODES | Number of nodes allocated to the job or the minimum amount of nodes required by a pending job |
| NODELIST (REASON) | For pending and failed jobs, this field displays the reason for pending or failure. Otherwise, this field shows a list of allocated nodes |
The squeue command gives us the following information:
- JOBID: The unique ID for your job.
- PARTITION: The partition your job is running on (or scheduled to run on).
- NAME: The name of your job.
- USER: The username for whomever submitted the job.
- ST: The status of the job. The typical status codes you may see are:
- CD (Completed): Job completed successfully
- CG (Completing): Job is finishing, Slurm is cleaning up
- PD (Pending): Job is scheduled, but the requested resources aren’t available yet
- R (Running): Job is actively running
- TIME: How long your job has been running.
- NODES: How many nodes your job is using.
- NODELIST(REASON): Which nodes your job is running on (or scheduled to run on). If your job is not running yet, you will also see one of the following reason codes:
- Priority: When Slurm schedules a job, it takes into consideration how frequently you submit jobs. If you often submit many jobs, Slurm will assign you a lower priority than someone who has never submitted a job or submits jobs very infrequently. Don’t worry, your job will run eventually.
- Resources: Slurm is waiting for the requested reasources to be available before starting your job.
- Dependency: If you are using dependent jobs, the parent job may show this reason if it’s waiting for a dependent job to complete
[qiuwa@l001 ~/bin]$ sprio
JOBID PARTITION PRIORITY SITE AGE FAIRSHARE JOBSIZE PARTITION
2182552 shared 1029473 0 1000000 28470 4 1000
2182553 shared 1029473 0 1000000 28470 4 1000
2182554 shared 1029473 0 1000000 28470 4 1000
2182555 shared 1029473 0 1000000 28470 4 1000
2182556 shared 1029473 0 1000000 28470 4 1000
2182557 shared 1029473 0 1000000 28470 4 1000
2182558 shared 1029473 0 1000000 28470 4 1000
…